
CARA MEMBUAT MESIN ABSEN MENGGUNAKAN ARDUINO
Amankan project Arduino Anda dengan biometrics. Produk ini merupakan sensor sidik jari optikal, yang dapat mendeteksi sidik jadi dengan verifikasi yang sangat sederhana. Module sensor ini bekerja dengan otak utama berupa chip DSP yang melakukan image rendering, kemudian mengkalkulasi, feature-finding dan terakhir searching pada data yang sudah ada.
Output sensor ini berupa TTL serial, yang memungkinkan dapat dihubungkan dengan Arduino maupun mikrokontroler lainnya. Produk ini mampu menyimpan data hingga 162 sidik jari pada FLASH memory internalnya. Produk ini dilengkapi dengan LED merah pada lensa yang akan menyala sebagai indikator ketika pengambilan gambar berlangsung.
Sebelum module sensor ini dapat digunakan, Anda terlebih dahulu harus memasukkan data sidik jari. Jika data sudah masuk, maka Anda dapat melakukan pencarian pada sketch Arduino Anda. Untuk memasukkan data sidik jari dapat dilakukan melalui software (berbasis OS Windows), ataupun menggunakan sketch Arduino.
Memasukkan Data Sidik Jari Menggunakan Software di OS Windows
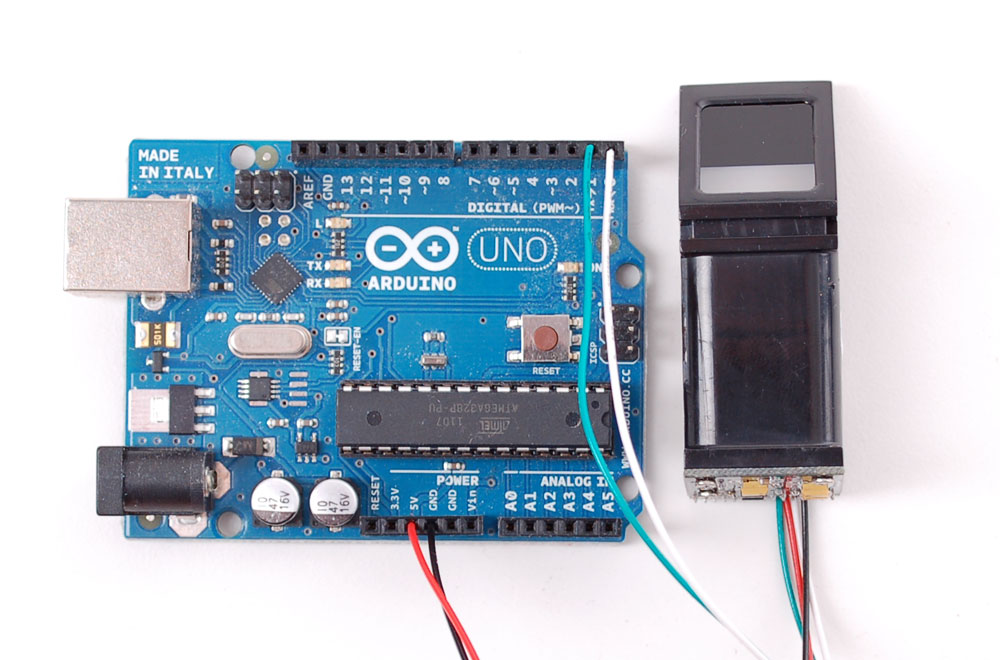
Hubungkan sensor dengan Serial Converter pada Arduino. Kemudian tulis dan upload sketch kosong berikut :
// Sketch ini untuk memby pass chip Atmega
// hubungkan fingerprint sensor dengan USB/Serial
// chip converter.

// Merah dihbungkan ke +5V
// Hitam dihubungkan ke Ground
// Putih dihubungkan ke  digital 0
// Hijau dihubugkan ke digital 1

void setup() {}
void loop() {}
Jalankan software SFGDemo kemudian click Open Device yang ada di bagian kiri bawah. Kemudian pilih COM port Arduino yang Anda gunakan pada komputer.

Tekan OK. Anda akan mendapati pesan “Open Device Success!” ketika Anda berhasil menghubungkan software, Arduino, dan sensor sidik jari tersebut.

Untuk memasukkan data sidik jari, pilih Preview, dan tekan Enroll (Con Enroll / “Continuous Enroll” berarti Anda hendak memasukkan data sidik jari yang lain). Akan muncul windows untuk memasukkan ID sidik jari yang akan Anda masukkan.

Lalu software akan meminta Anda untuk meletakkan sidik jari pada optikal sensor tersebut

Berikut salah satu contoh screenshootnya.

Anda memerlukan pengulangan proses, untuk mendapatkan hasil yang jelas. Ingat, Anda harus menggunakan jari yang sama. Jika berhasil, maka software akan mengeluarkan pesan “Success to enroll!”

Pencarian dengan Software
Jika data sidik jari sudah masuk, Anda dapat melakukan pencarian. Click “Search”. Letakkan jari yang akan dideteksi, jika berhasil, maka software akan memberitahu ID sidik jari tersebut.

Jika tidak ada data sidik jari tersebut, software akan memberitahu Anda pesan berkut :
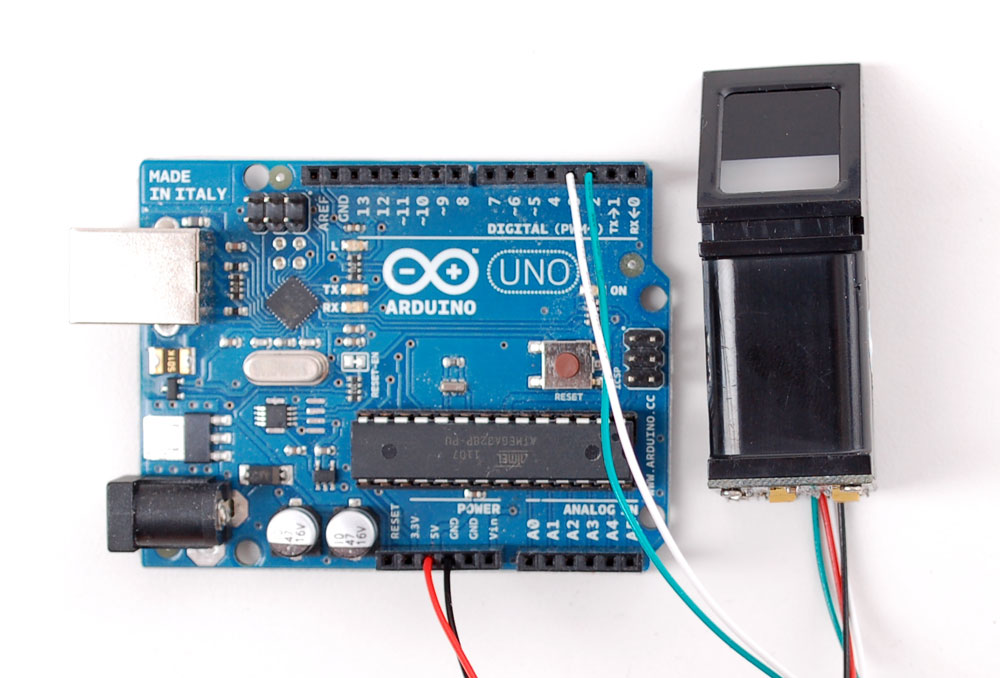
Wiring for use with Arduino
Once you’ve tested the sensor, you can now use it within a sketch to
verify a fingerprint. We’ll need to rewire the sensor. Disconnect the
green and white wires and plug the green wire into digital 2 and the white wire to digital 3.
You can change these pins later but for now, use the default pins.
Since the sensor wires are so thin and short, we stripped the wire a bit
and melted some solder on so it made better contact but you may want to
solder the wires to header or similar if you’re not getting good
contact. When you plug in the power, you should see the red LED blink to
indicate the sensor is working.

Next, To download click the DOWNLOADS button in the top right corner, rename the uncompressed folder Adafruit_Fingerprint. Check that the Adafruit_Fingerprint folder contains Adafruit_Fingerprint.cpp and Adafruit_Fingerprint.h Place theAdafruit_Fingerprint library folder your /libraries/ folder. You may need to create the libraries subfolder if its your first library. Restart the IDE.
Once you’ve restarted you should be able to select the File?Examples?Adafruit_Fingerprint?fingerprint example sketch. Upload it to your Arduino as usual. Open up the serial monitor at 9600 baud and when prompted place your finger against the sensor that was already enrolled.
You should see the following:

The ‘confidence’ is a score number (from 0 to 255) that indicates how good of a match the print is, higher is better. Note that if it matches at all, that means the sensor is pretty confident so you don’t have to pay attention to the confidence number unless it makes sense for high security applications.
If you want to have a more detailed report, change the loop() to run getFingerprintID() instead of getFingerprintIDez() – that will give you a detailed report of exactly what the sensor is detecting at each point of the search process.
Next, To download click the DOWNLOADS button in the top right corner, rename the uncompressed folder Adafruit_Fingerprint. Check that the Adafruit_Fingerprint folder contains Adafruit_Fingerprint.cpp and Adafruit_Fingerprint.h Place theAdafruit_Fingerprint library folder your /libraries/ folder. You may need to create the libraries subfolder if its your first library. Restart the IDE.
Once you’ve restarted you should be able to select the File?Examples?Adafruit_Fingerprint?fingerprint example sketch. Upload it to your Arduino as usual. Open up the serial monitor at 9600 baud and when prompted place your finger against the sensor that was already enrolled.
You should see the following:
The ‘confidence’ is a score number (from 0 to 255) that indicates how good of a match the print is, higher is better. Note that if it matches at all, that means the sensor is pretty confident so you don’t have to pay attention to the confidence number unless it makes sense for high security applications.
If you want to have a more detailed report, change the loop() to run getFingerprintID() instead of getFingerprintIDez() – that will give you a detailed report of exactly what the sensor is detecting at each point of the search process.
Enrolling with Arduino
We did put together a simple sketch for enrolling a new finger via
Arduino – its not as easy to use as the Windows program but it does
work. Run the File?Examples?Adafruit_Fingerprint?enroll sketch and upload it to the Arduino, use the same wiring as above.
When you open up the serial monitor, it will ask for you to type in the ID to enroll – use the box up top to type in a number and click Send

Then go through the enrollment process as indicated. When it has successfully enrolled a finger, it will print Stored!

Don’t forget to do a search test when you’re done enrolling to make sure its all good!
When you open up the serial monitor, it will ask for you to type in the ID to enroll – use the box up top to type in a number and click Send
Then go through the enrollment process as indicated. When it has successfully enrolled a finger, it will print Stored!
Don’t forget to do a search test when you’re done enrolling to make sure its all good!
Tidak ada komentar:
Posting Komentar